Adding a Catalogue Item Manually
Description Fields for Catalogue Items
Making Changes to a Catalogue Item
To begin distributing content, you first need to create a catalogue. A content catalogue is a list of content to be distributed. The platform allows you to automatically load existing catalogues in CSV or ONIX formats. Functionality will be added shortly for loading data in these formats via API.
You could also create a catalogue item manually.
Adding a Catalogue Item Manually
1. To manually create a catalogue item in Aggregion, click on the Catalogue tab (red arrow on Exhibit 1).

Exhibit 1
2. Click on the "Add Catalog Item" button (green arrow on Exhibit 1).
3. In the window that opens (Adding New Item), fill out all the applicable fields that best describe the catalogue item you are creating.
Description Fields for Catalogue Items
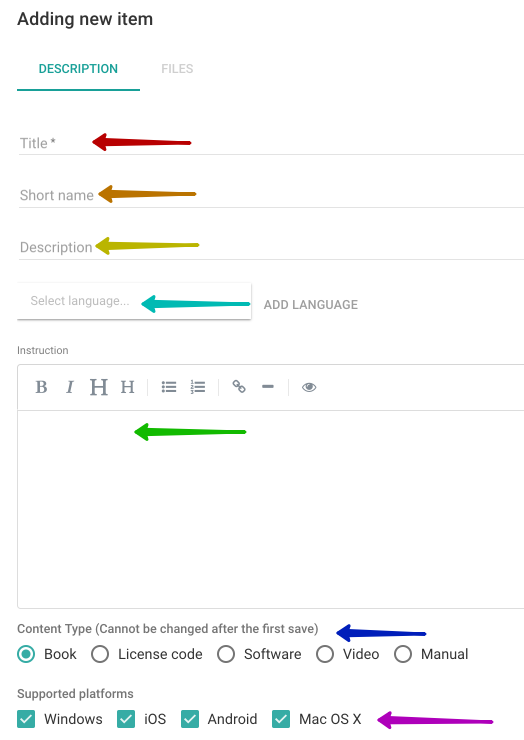

Exhibit 2.1 Exhibit 2.2
1. Title (red arrow on Exhibit 2.1). Enter the title of your new catalogue item (see an example on Exhibit 3).

Exhibit 3
2. Short name (orange arrow on Exhibit 2.1). If desired, enter a short name for your new catalog item.
3. Description (yellow arrow on Exhibit 2.1). Enter a brief description of your new catalogue item (see an example on Exhibit 4).

Exhibit 4
4. User instructions (green arrow on Exhibit 2.1). If desired, you can add end-user instructions on how to use this item or how to activate a copy. These instructions will be sent to the end user by email along with access to content.
5. Language identifier (field marked with a light blue arrow on Exhibit 2.1) is used to make sure the Title and Description match the language spoken by the intended buyers that will see them in your storefront. The language in which the Title and Description are written will be the primary language. You can also add as many additional languages as needed, using the "Add Language" button (light blue arrow on Exhibit 2.1).

Exhibit 5
6. Content Type (field marked with a blue arrow on Exhibit 2.1) – only one option can be selected.
For "Book," one, several or all of the operating systems supported must be selected, as shown on Exhibit 2.1 (purple arrow). The book would then be available on devices running the OS selected. It will NOT be available on devices running an operating system OTHER than that selected.
For "License Code," "Software" and "Video," the URL needs to be specified, so the end user could click through to where the content is located. See an example on Exhibits 6.
You can also specify the URL for "Video". Otherwise, the player address will be used for playback by default.

Exhibit 6
7. Search tags (field marked with a red arrow on Exhibit 2.2) are used to streamline searching and organize catalogue items at a store or on a library site. To add a tag, enter it in the field and press "Enter". If a tag has been used before, the platform will autosuggest it.
8. Cover. The cover uploaded will show in the "Upload Cover" field (green arrow on Exhibit 2.2).
8.1. Uploading a Cover Directly from a Device
8.1.1. To upload a cover for the catalogue item from a device, click on "File Upload" (black arrow on Exhibit 2.2).
8.1.2. Select "File Upload" (red arrow on Exhibit 7) in the window that pops up.

Exhibit 7
8.1.3. Select the file desired in an appropriate format (.jpg, .jpeg, .png, .gif, .tiff), with the smallest dimension of at least 300 px. The file size may not exceed 100 MB.
8.1.4. Click on the "Open" button (red arrow on Exhibit 8 below).

Exhibit 8
8.1.5. Then click on the "Save" button (green arrow on Exhibit 9).
8.1.6. To cancel, use the "Cancel & don't upload" button (red arrow on Exhibit 9).
8.1.7. The file uploaded will be automatically saved in storage.

Exhibit 9
8.2. Uploading a Cover from Storage
8.2.1. To upload a cover for the catalogue item from storage, click on "Choose from the storage" (orange arrow on Exhibit 2.2).
8.2.2. Use the left button of your mouse to select the image desired (see the red arrow on Exhibit 10 for an example).
8.2.3. Click on the "Set as a cover" button (green arrow on Exhibit 10).
8.2.4. You could also use the search function button (blue arrow on Exhibit 10) to find the image you need.

Exhibit 10
9. Content Preview (blue arrow on Exhibit 2.2). To use the preview function, click on "Upload File" or "Choose from the storage" (purple and light blue arrows on Exhibit 2.2, respectively) and follow instructions similar to those in paras 7 and 8.
The file uploaded into that field may be used at your online store.
10. Additional Field. Use this field to enter any additional information about the catalogue item. For that purpose, enter the field name where indicated by the blue arrow on Exhibit 11 below and the field value where indicated by the green arrow. You can add this field to just this particular item or any additional items to be created in the future. To delete an unneeded field, select it as shown on Exhibit 12 and press the "Remove" button (purple arrow on Exhibit 12).
Information entered in this field could then be used in your storefront.

Exhibit 11

Exhibit 12
Item descriptions in the catalogue could be updated automatically. To do this, you will need to use the additional field for the externalId parameter. The value to be entered for it must be the unique external identifier for this catalogue item within your system. For books, it's their ISBN; for other types of content, give the item's compound name (Exhibit 13).

Exhibit 13
Saving a Catalogue Item
1. To save and add files right away, click on "Save and Add Files" (red arrow on Exhibit 14 below). You do not need to add the files right away. This could be done later.

Exhibit 14
2. To save and create another catalogue item, click on "Save and Add Another Item" (yellow arrow on Exhibit 14).
3. To simply save the item created, click on the "Save" button (green arrow on Exhibit 14).
4. To cancel all the changes you made, click on the "Cancel" button (black arrow on Exhibit 14).
Exporting Catalog Items
All items saved in the catalog may be exported to your device. To do that, click on the “Export to Excel” button (blue arrow on Exhibit 15). Catalog items will be saved on your device as an .xlsx file.

Exhibit 15
Making Changes to a Catalogue Item
To make changes to an existing catalogue item, click on the Edit symbol (see the blue arrow on Exhibit 16) or click the left button of your mouse to the name of the catalogue item.

Exhibit 16
Deleting a Catalogue Items
You can only delete a catalogue item if it has never been transferred to anyone.
To delete a catalogue item, select it by putting a check mark in the box marked with a red arrow on Exhibit 15 and press "Remove" (green arrow on Exhibit 17).
Any such deletion will be final. You will not be able to restore the item.

Exhibit 17