Installing and Launching A-Store Reader
Special abilities (printing, notes, bookmarks)
Requires Windows 7, 8.1 or 10.
Please note that some of the steps may require additional downloads and data use. We recommend you use a Wi-Fi connection.
Installing and Launching A-Store Reader
1. When a user is granted access to content, such as a digital book, interactive content or offline video, the user will receive a notification by email (Exhibit 1).

Exhibit 1
2. The email may contain the following information:
Information on the content received (red arrow on Exhibit 1);
Login information for A-Store Reader (green arrow on Exhibit 1);
Links to download A-Store Reader (light blue arrow on Exhibit 1).
3. If you already have an A-Store account, the email will only refer to the account to which content has been sent (Exhibit 2).

Exhibit 2
4. To be able to work with this application, you need to install it on your device first. The link to download A-Store Reader will be marked by icons (blue arrow on Exhibit 1). Select the appropriate link for your device (Windows or macOS desktop or notebook, iPad or iPhone, Android smartphone or tablet computer). Click on the appropriate icon, and the player download will begin automatically.
You can also download the software from www.a-store.io (Exhibit 3) or from corresponding app stores.
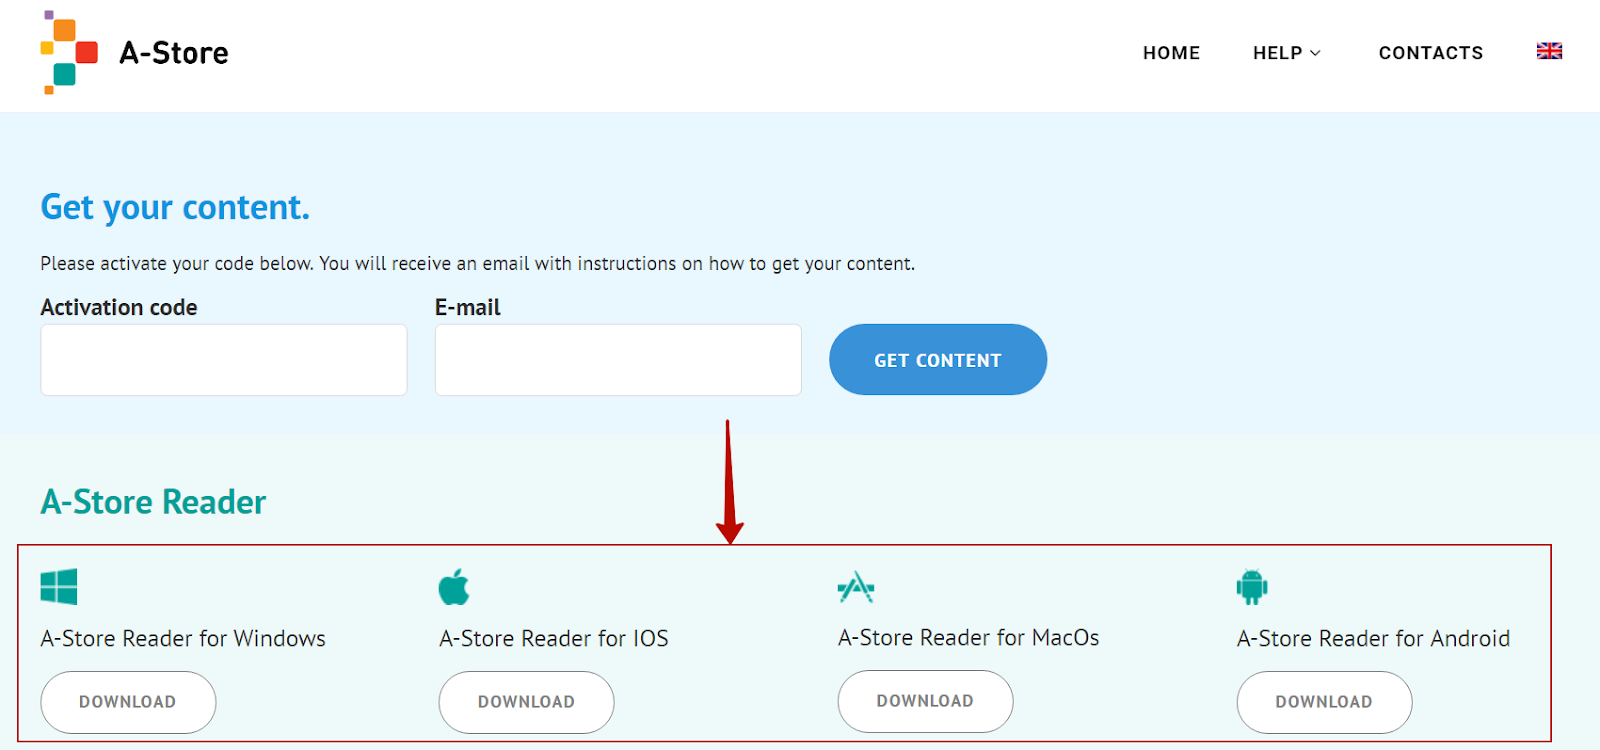
Exhibit 3
5. Once the download is complete, you can begin installation. To begin installation under Windows, find the setup file (Exhibit 4). It may be in the Download folder, on the desktop or in any other folder downloads are routed to on your device.

Exhibit 4
6. Setup begins with opening the A-Store Reader Setup window (Exhibit 5). Click on the “Install” button and follow the instructions on the screen. When installing the program, you need to be logged in as the administrator of your device.
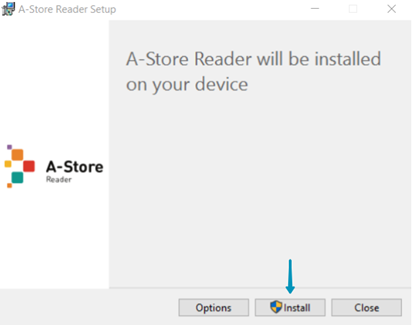
Exhibit 5
7. Once installation is over, please restart the device to make sure all software loads correctly.
8. Your desktop will now have an icon for A-Store Reader (Exhibit 6).
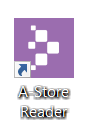
Exhibit 6
9. To launch the application, double-click on the icon shown on Exhibit 6.
Logging in to A-Store Reader
1. When you launch the app for the first time, logging in will be required. To do so, enter the information provided in the email notification (green arrow on Exhibit 1) into the window that opens (Exhibit 7). Once you log in, there is no need to enter your information during subsequent visits, unless you log out manually.

Exhibit 7
2. If the login window does not open automatically, go to Menu (green arrow on Exhibit 8) and click on the “Sign in” button (red arrow on Exhibit 8).
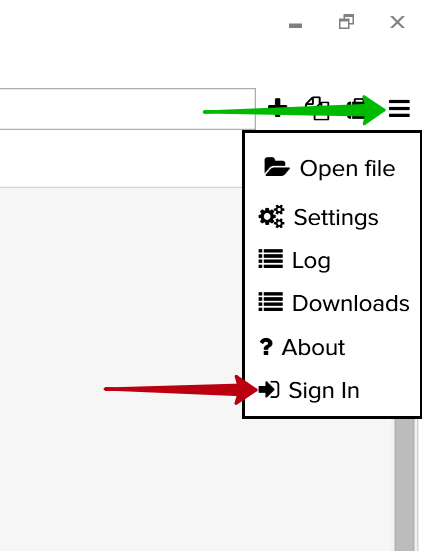
Exhibit 8
Working with the collection
1. Once logged in, you will see your collection. This is where all the content received by your account is stored.
2. To keep the collection up to date, it is recommended that you refresh it regularly, by pressing the “Refresh” button (green arrow on Exhibit 9).

Exhibit 9
3. To begin working with content, download it to your device. To do that, click on the cover and confirm the download (Exhibit 10).

Exhibit 10
4. During the download, the green bar indicator will reflect download progress. Once download is complete, the cover will become active (bright) (Exhibit 11).
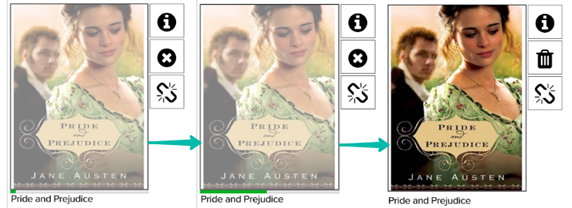
Exhibit 11
5. Once downloaded, content will be tied to your device. This is something to keep in mind, especially when such content may only be tied to a single device. In such a case, to be used on a different device, content will have to be untied from the original device.
The email notification will indicate the maximum number of devices content is authorized to be simultaneously used on (blue arrow on Exhibit 1).
6. To untie content from a device, click on the “Untie” button located next to the cover (light blue arrow on Exhibit 12) or the “Untie All” button in the upper left-hand corner of the player (light blue arrow on Exhibit 13).
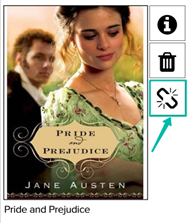
Exhibit 12

Exhibit 13
7. Content untied from a device will have a shadowed cover, which will have an active “Tie” button next to it instead of “Untie” (Exhibit 14). It is important to remember that content will remain tied to a device unless you manually untie it. In other words, when you need to play your content on a device again, once you have clicked on the “Tie” button, there is no need to download this content to the device again.
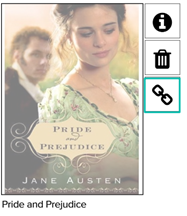
Exhibit 14
8. To remove content, click on the “Remove” button (Exhibit 15).
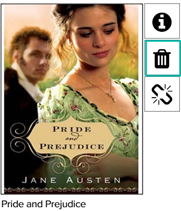
Exhibit 15
Working with PDF content
1. To open content, click on its cover. The first time you do it, the first page of the book will be displayed. If you started reading the book earlier, it will open on the page you previously stopped reading it on.
2. There are two modes for displaying book pages.
2.1. Single Page. To change the display mode, click on the button marked with a green arrow on Exhibit 16.

Exhibit 16
2.2. Two-Page. To change the display mode, click on the button marked with a green arrow on Exhibit 17.

Exhibit 17
3. To zoom in or out, use the “+” or “-” buttons (blue arrow on Exhibit 18) as needed.

Exhibit 18
4. To navigate in the zoomed-in text, use the left button of your mouse to drag it sideways.
5. To scroll the text, use your mouse wheel or the special buttons marked with a red arrow on Exhibit 19.

Exhibit 19
6. Ways to Search for Pages
6.1. Search Field
Enter the number of the page you want to go to, and the software will take you right to it.

Exhibit 20
6.2. Table of Contents (Content-Specific)
6.2.1. Click on the “Navigation” button (green arrow on Exhibit 21) and select the “Outline” tab (blue arrow on Exhibit 21).

Exhibit 21
6.2.2. Scroll through the headers using the wheel of your mouse or the scroll bar, pick the one you need and click on it.
6.2.3. If you cannot find the header you want, use the search function in the table of contents. Go to “Search,” enter the key word(s) in the field and click on the “Search” button. Then select your header from the results returned.

Exhibit 22
7. Interactive TOC
If the book has an interactive table of contents, select the section desired and click on it to move to the actual text.
8. Audio in Digital Books
8.1. An icon next to an exercise the book indicates that a soundtrack is available. Depending on specific content, there may be different icons. For example, the icon may look as shown on Exhibit 23. To start audio playback, click on the icon.

Exhibit 23
8.2. Information about the audio played and the playback/stop (Exhibit 24.1) or pause/stop (Exhibit 24.2) buttons will be displayed at the bottom of the page.

Exhibit 24.1

Exhibit 24.2
9. Video in Digital Books
9.1. An icon next to an exercise in the book indicates that a video is available. Depending on specific content, there may be different icons. For example, the icon may look as shown on Exhibit 25. To start video playback, click on the icon.
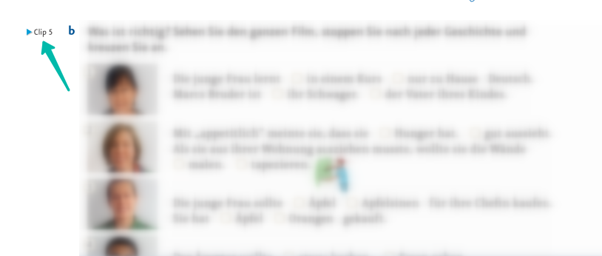
Exhibit 25
9.2. You can stop the video at any time during playback (green arrow on Exhibit 26), fast forward or rewind it (blue arrow on Exhibit 26) and set the volume (red arrow on Exhibit 26).
Exhibit 26
9.3. To exit video playback, click on the “Back” button (light blue arrow on Exhibit 27).

Exhibit 27
Special abilities (printing, notes, bookmarks)
1. Printing
Book pages may be printed out by clicking on the “Print” button marked with a blue arrow on Exhibit 28. If the Copyright Holder disabled or limited this option, the “Print” button will be grayed out.

Exhibit 28
2. Tabs
To create a bookmark, click on the icon marked with a red arrow on the “Toggle Bookmark” button (green arrow on Exhibit 29).
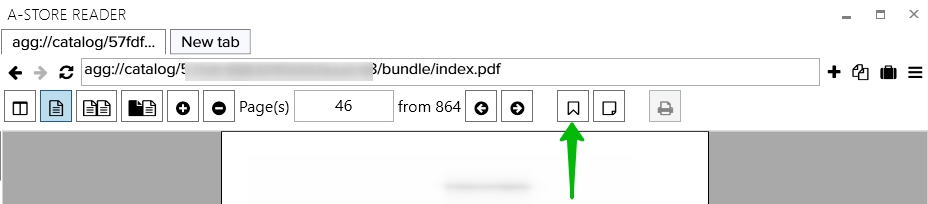
Exhibit 29
It will turn black (Exhibit 30).

Exhibit 30
3. Notes
To create a note, click on the “Add Note" button (red arrow on Exhibit 31). After that, select the text you want to add a note to with your mouse. It will be highlighted in yellow (yellow arrow on Exhibit 31).
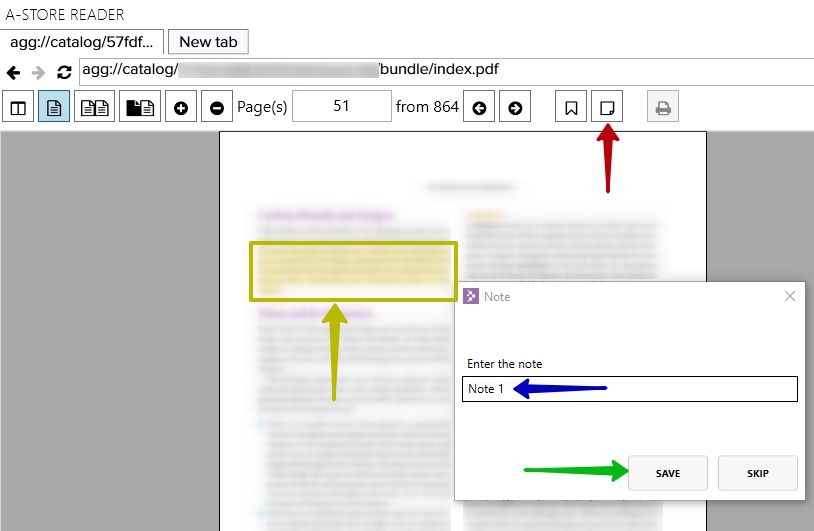
Exhibit 31
In the window that opens, enter your note in the appropriate field (blue arrow on Exhibit 31) and click on the “Save” button (green arrow on Exhibit 31).
4. All of the notes added and bookmarks created could be found in the “Navigation” section (blue arrow on Exhibit 32), in the “Notes” (red arrow on Exhibit 32) and “Bookmarks” (green arrow on Exhibit 32) tabs.

Exhibit 32
All of your notes and bookmarks will be available on all of the devices you will be using to work with this content under your own login name.
Enjoy your content!
