To make content available to buyers, you need to create a product. A product is a set of rules related to a list of goods.
1. Open the “Products" tab (red arrow on Exhibit 1), and select “Product List” (green arrow on Exhibit 1).

Exhibit 1
2. Click on the “Add Product” button (blue arrow on Exhibit 1).
3. In the window that opens, fill in all the fields marked with an asterisk (*) (Name, Distribution Type, Status). Other fields are optional (Exhibit 2).

Exhibit 2
3.1. Name (yellow arrow on Exhibit 2). This is the product name that serves as its identifier during the distribution process.
3.2. Description (green arrow on Exhibit 2). For extra convenience, in this field, you can give an additional description and list the catalog items included.
3.3. Distribution Type (orange arrow on Exhibit 2) refers to the type of the buyer the product is intended for. These may be organizations or individuals. This helps limit access to content for some groups, but not others (such as, for example, where such content is intended for use by an educational institution but not by individual pupils or students. Alternatively, both these groups could be granted access. Once a product is created, you cannot change its distribution type.
3.4. Status (purple arrow on Exhibit 2). To make the product available for distribution, select “For Sale” for its status. “Hidden” in the status field prevents any subsequent sales. “Archived” means the product is no longer available altogether.
Attention! “Archived” in the status field essentially means the product has been removed and cannot be reactivated again.
3.5. “For Testing” (blue arrow on Exhibit 2) products are intended as training tools to help users familiarize themselves with the system. Test products do not involve any sales. They cannot be transferred to other members of the distribution channels or displayed in an online store.
3.6. Automatically Accept All New Prices (red arrow on Exhibit 2). Whenever pricing for a product made available to resellers and offered for sale is changed, it automatically gets marked as “New price” until the resellers accept such changes. Check Automatically Accept All New Prices to keep the product as available “For Sale” from the resellers when its pricing changes (in this case, only the reseller’s purchase price changes and the sales price does not).
3.7. If desired, you can set limits for each of your resellers. No limits are set by default.
3.7.1. If the number of copies of a particular item a reseller is allowed to sell has been entered, no further sales will be possible once that limit is reached. A reseller cannot sell more copies than the number allowed. Use a numeric (not verbal) value to set the limit (green arrow on Exhibit 3).
3.7.2. If desired, you can also limit the overall sales amount authorized for a particular reseller. Once that amount is reached, this reseller will be automatically prevented from making any more sales. The sales amount limit is set using numbers (blue arrow on Exhibit 3) at the reseller's purchase price in the appropriate currency.

Exhibit 3
3.7.3. Product recipients may see their limits in the My Limits section (red arrow on Exhibit 4). Information about Products transferred to your account is available under the Distributed Limits tab (green arrow on Exhibit 4). Information about products you create within your own account is recorded under the My Limits tab (blue arrow on Exhibit 4).

Exhibit 4
3.7.3.1. The "Total items" (green arrow on Exhibit 5) shows the total number of items in any given product made available.
3.7.3.2. "Used items" (blue arrow on Exhibit 5) shows how many items have been distributed.
3.7.3.3. "Total licenses sold" (red arrow on Exhibit 5) shows how many licenses have been sold.
3.7.3.4. The "Limit of licenses" (yellow arrow on Exhibit 5) shows how many licenses for this product have been authorized to be sold.
3.7.3.5. "Total sale amount" (pink arrow on Exhibit 5) shows total proceeds from license sales. The amount is calculated based on the purchase price in the appropriate currency.
3.7.3.6. The "Limit of sale amount" (black arrow on Exhibit 5) shows the total authorized sales amount for this product. The amount is calculated based on the purchase price in the appropriate currency.

Exhibit 5
3.8. Resellers. Specify the resellers of your proposed product (Exhibit 6).
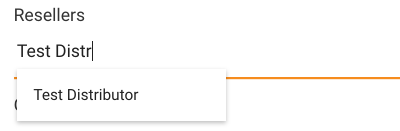
Exhibit 6
3.9. Geotargeting (yellow arrow on Exhibit 7.1 below). In Aggregion, you can make a product available in certain countries only or anywhere in the world. To make it available everywhere, select “All”. To limit availability to certain countries only, specify these countries as shown on Exhibit 7.2. In such a case, the customer’s IP will determine the country where he or she is located. If your product is intended to be displayed and offered in certain countries only, customers from other countries will have no access to it.

Exhibit 7.1

Exhibit 7.2
4. For digital books and video, you can specify additional parameters.
To do that, go to the “Defaults for file types” tab (red arrow on Exhibit 8).

Exhibit 8
4.1. For digital books, select “E-Books” (blue arrow on Exhibit 9.1) and set these parameters as you see fit (by default, no restrictions will be imposed).
If you intend to allow end users to print material from the book, please indicate the range of pages authorized to be printed out (green arrow on Exhibit 9.1). Feel free to establish as many such ranges as you want (red arrow on Exhibit 9.1). Users will not be able to print if no page range is established.
Count of deliveries (yellow arrow on Exhibit 9.1) indicates the number of outbound license transfers and recalls the user is authorized to make.
Maximum Number of Devices (pink arrow on Exhibit 9.1) shows the number of devices the user's copy of the content may be tied to at the same time.
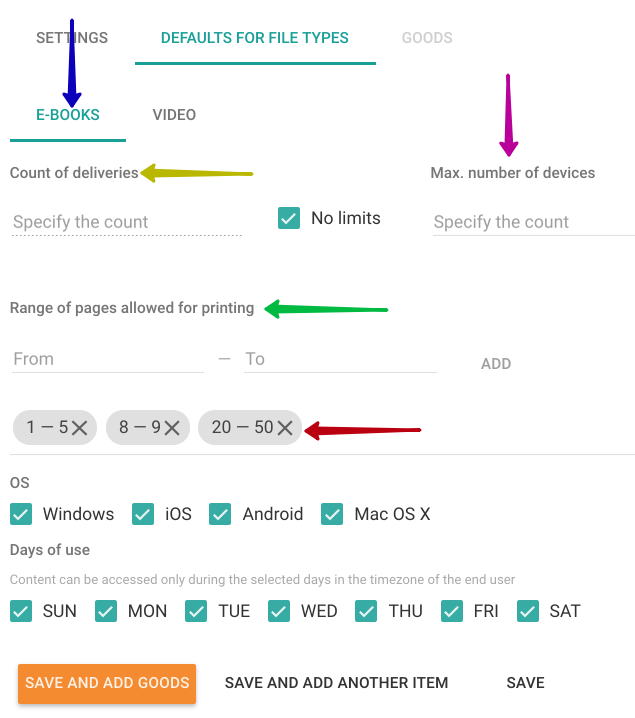
Exhibit 9.1
4.2. For video, select “Video” (purple arrow on Exhibit 9.2) and set these parameters as you see fit (by default, no restrictions will be imposed).

Exhibit 9.2
5. Save the product.
5.1. To save and add files right away, click on “Save and Add Goods” (red arrow on Exhibit 10). You do not need to add the files right away. This could be done later.
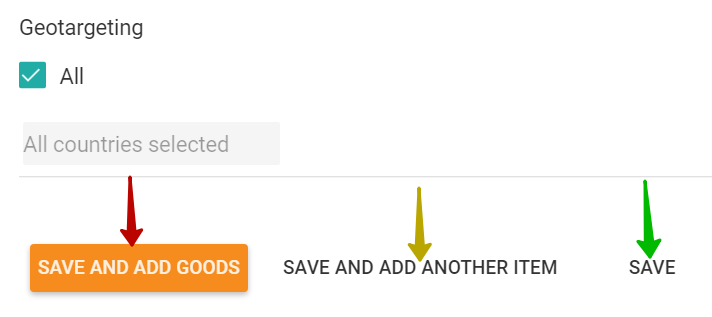
Exhibit 10
5.2. To save and create another product, click on “Save and Add Another Item” (yellow arrow on Exhibit 10).
5.3. To simply save the product created, click on the “Save” button (green arrow on Exhibit 10).
6. Once content is added and the product saved, the content window will open. You can also access it by clicking on “Edit Product” (red arrow on Exhibit 11) and then on “Goods” (yellow arrow on Exhibit 12).
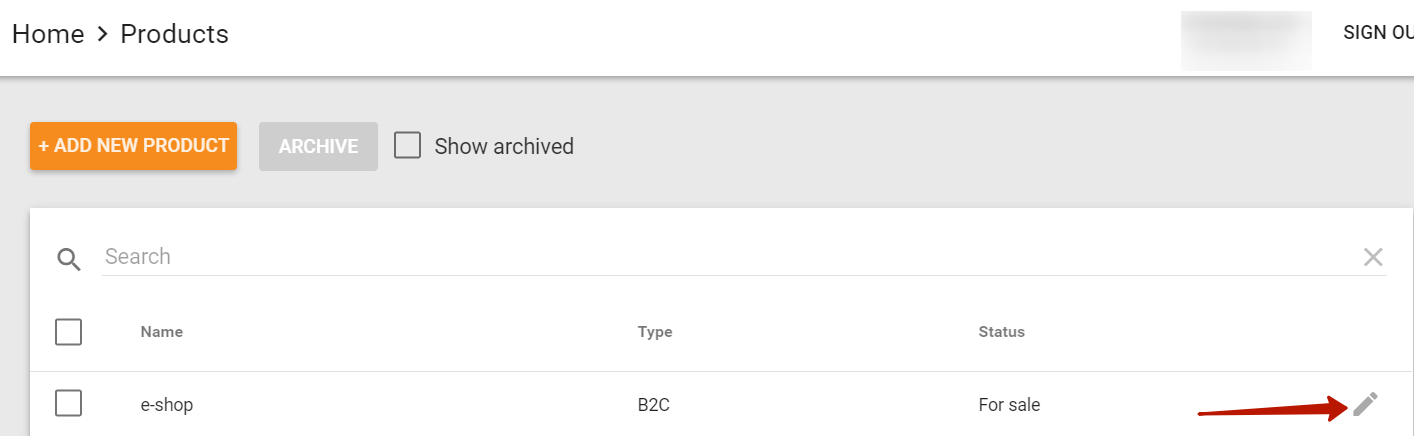
Exhibit 11

Exhibit 12
7. Products may be added in three separate ways:
7.1. Mass Upload
If you would like to mass upload items, click on the "Mass Upload" button (red arrow on Exhibit 12). However, before you do that, we suggest you familiarize yourself with the Mass Upload section of this manual.
7.2. Adding All Available Items
To add all available items, press the “Add All Goods" button (green arrow on Exhibit 12).
7.3. Adding Items Manually
To add items manually, click on the “Add” button (blue arrow on Exhibit 12).
7.3.1. In the opened window the goods are divided into three categories:
- Catalogs - Catalog items that you have created red arrow on Exhibit 13)
- Collections - items united in collections (green arrow on Exhibit 13)
- Goods - goods that were transferred from another member of the distribution chain (the blue arrow on Exhibit 13)
Each category is displayed if there is at least one position in it.
Select the desired content for the intended product as shown on Exhibit 13 and click the "Add to product" button (marked with a purple arrow on exhibit 13).
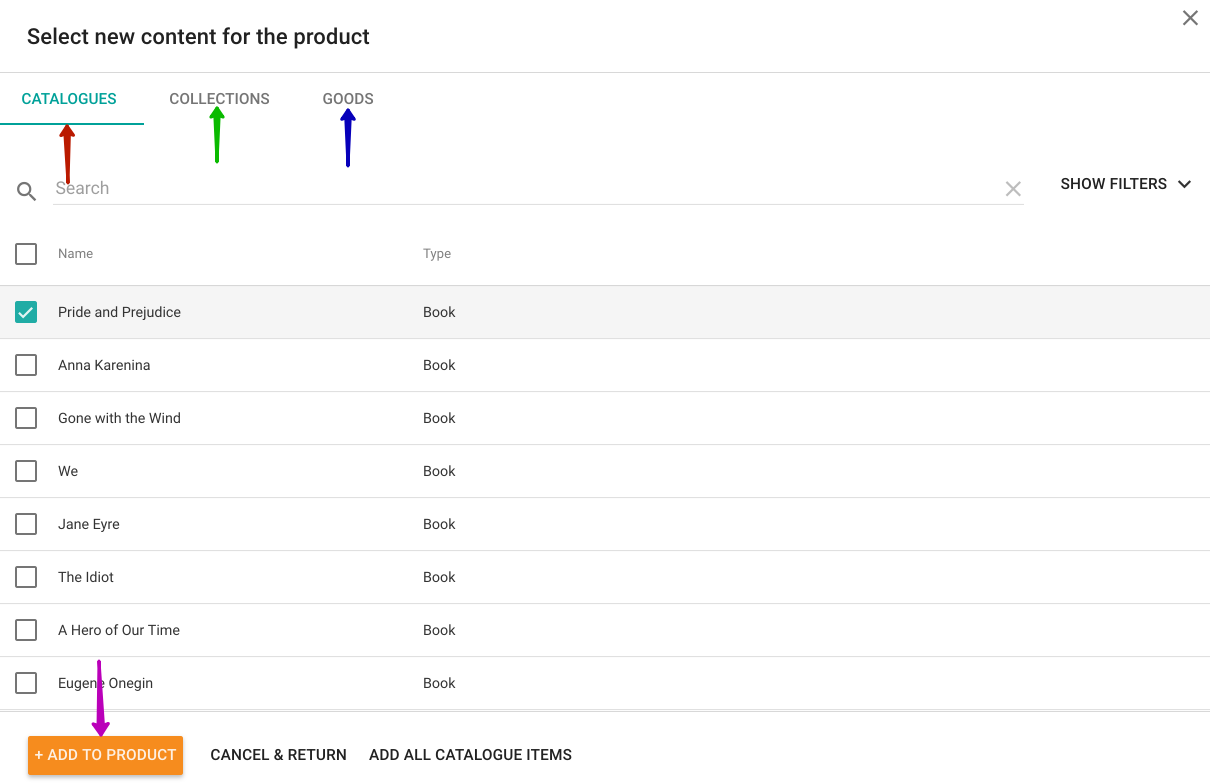
Exhibit 13
8. Once your items are added to a product, you will need to set licensing parameters for each of them.
8.1. The main screen contains mandatory fields that are required for the distribution process. These fields are:
- Licensing period (blue arrow on Exhibit 14). It is set in days. Only the copyright holder may make changes to this field;
- Suggested retail price (green arrow on Exhibit 14);
- Currency (yellow arrow on Exhibit 14);
- Status (pink arrow on Exhibit 14). If your items are ready to be sold, set the status to "For Sale". If you wish to temporarily withhold an item from being sold, set its status to "Hidden". The "New price" status is set automatically when any parameters of the parent product have been changed. This indicates that the status of this product needs to be updated to "For Sale" or "Hidden". Products marked as "Archived" have been removed and are no longer available. A similar designator, Archived by Owner, is automatically assigned to products that have been deleted from the parent catalog from which the product was transferred to the user account.

Exhibit 14
8.1.1. Primary fields may be edited on the main screen—for each item separately, for a group of items, or for all items in a product displayed on the screen.
8.1.1.1. To edit the primary fields for each item separately, change or enter them on the main screen.
8.1.1.2. To edit the primary fields for a group of items, select them as shown on Exhibit 15 and press the "Edit" button (green arrow on Exhibit 15).
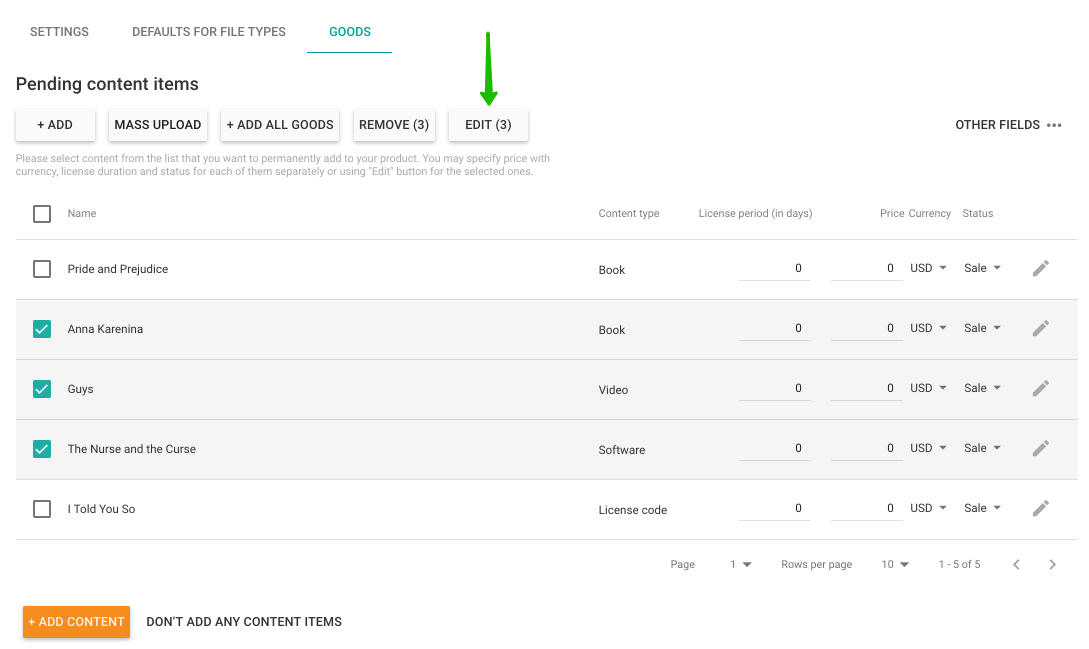
Exhibit 15
8.1.1.3. To edit the primary fields for all items in a product displayed on the screen, check the box marked with a red arrow on Exhibit 16 and press the "Edit" button (blue arrow on Exhibit 16).

Exhibit 16
8.1.2. Enter or change the required parameters on the screen and click on "Save and Return" (blue arrow on Exhibit 17) if you want to apply them to all the items selected, or "Cancel and Return" (green arrow on Exhibit 17) if you do not want the changes you made applied.

Exhibit 17
8.2. There are a number of additional licensing parameters that only apply to Books and Video. By default, no limitations are set in these additional fields.
8.2.1. Additional licensing parameters may be edited for each item separately or for a group of content items of the same type.
8.2.1.1. To edit additional licensing parameters for one item only, click on the "Edit" icon next to this item (green arrow on Exhibit 18).

Exhibit 18
8.2.1.2. To edit additional licensing parameters for a group of items of the same type (for example, Book), select them as shown on Exhibit 19 and press the "Edit" button (blue arrow on Exhibit 19).
Please note that you cannot simultaneously edit additional licensing parameters for a group of items of different types.

Exhibit 19
8.2.2. Edit Additional Licensing Parameters for a Group of Book Items
In addition to the primary fields displayed on the main screen, you can specify the following for Book files:
8.2.2.1. Count of deliveries (black arrow on Exhibit 20) indicates the number of outbound license transfers and recalls the user is authorized to make.
8.2.2.2. Maximum Number of Devices the user's copy may be tied to at the same time (blue arrow on Exhibit 20);
8.2.2.3. Operating systems supported—one, several or all—as shown on Exhibit 20 purple arrow. The book would then be available on devices running the OS selected. It will NOT be available on devices running an operating system OTHER than that selected;
8.2.2.4. Range of pages authorized for printing. If you intend to allow end users to print material from the book, please indicate the range of pages authorized to be printed out (green arrow on Exhibit 20). Feel free to establish as many such ranges as you want (red arrow on Exhibit 20);
8.2.2.5. Days of use (yellow arrow on Exhibit 20). This parameter will authorize access to the book only on the specified days of the week, but not on the others.

Exhibit 20
8.2.3. Edit Additional Licensing Parameters for a Group of Video Items
In addition to the primary fields displayed on the main screen, you can specify the following for Video files:
8.2.3.1. Count of deliveries (light blue arrow on Exhibit 21);
8.2.3.2. Exact hours for playing. Add one or more time periods during which content could be played back (green arrow on Exhibit 21); Content will only be available during these hours. Feel free to establish as many such time periods as you want (blue arrow on Exhibit 21);
8.2.3.3. Quality. Select the quality in which the video could be played back (red arrow on Exhibit 21);
8.2.3.4. Geotargeting. Select the countries in which content may be accessed (yellow arrow on Exhibit 21). If you don't want to impose any such limitations, check the "All" box (pink arrow on Exhibit 21);
8.2.3.5. Days of use (black arrow on Exhibit 21). This parameter will authorize content playback only on the specified days of the week, but not on the others.

Exhibit 21
8.2.4. Enter or change the required parameters on the screen and click on "Save and Return" (green arrow on Exhibit 22) if you want to apply them to all the items selected, or "Cancel and Return" (blue arrow on Exhibit 22) if you do not want the changes you made applied.

Exhibit 22
8.3. After editing the primary and additional licensing parameters for a group of items, select, as shown on Exhibit 23, those of them that you want the changes applied to and press the "Save to the Product" button (blue arrow on Exhibit 23). If you do not want to add these items, click on the "Don't Add Any Content Items" button (green arrow on Exhibit 23).

Exhibit 23
8.4. All parameters, except for the licensing period, may be edited even after the items have been saved in a product. Once changes have been made to products, the "Save All Changes" button (green arrow on Exhibit 24) will become active. Press this button to save the changes. If you do not want to save these changes, press the "Reset All Changes" button (blue arrow on Exhibit 24).

Exhibit 24
8.5. All of the goods saved in a product may be exported as an .xlsx table. To do that, click on the “Export to Excel” button (red arrow on Exhibit 25), and a table of items in a product and their parameters will be downloaded to your device.
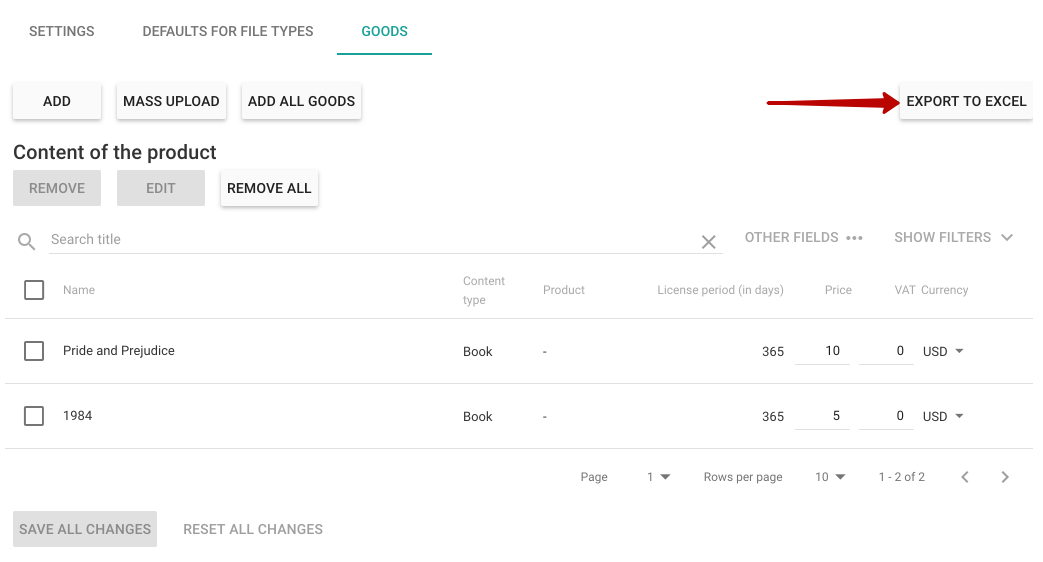
Exhibit 25
8.6. For the convenience of working with a large amount of content in the product, you can use filters (blue arrow on Exhibit 26).

Exhibit 26
In the window that opens, you can sort the goods of this product by the parameters:
- tags, if they were assigned to the content (yellow arrow on Exhibit 27)
- field name and value - indicates the name of the field and its value (blue arrows on Exhibit 27)
- status,
- content owner,
- content type,
- license period in days (green arrow on Exhibit 27),
- price (red arrow on Exhibit 27).
To reset the data specified in the filters, click the “Clear Filters” button (blue arrow on Exhibit 27).

Exhibit 27
9. The product is ready for distribution.