Withdrawing Previously Assigned Licenses
Transferring of Content as a Batch
Once bought, the content purchased and the number of licenses available is shown in your account. To go to the personal account page, click on the button marked with a red arrow on Exhibit 1 or access it through my.aggregion.com. The purchased content will be placed in the "Activate" section (blue arrow on Exhibit 1). The “Transfer” column (green arrow on Exhibit 1) will show the total number of licenses issued or purchased. Content may be transferred only if there are unused licenses available. Once all licenses have been issued (including those activated to self), transfer and activation buttons will be disabled (greyed-out).

Exhibit 1
Activation for yourself
To activate the content, click on the “Activate for yourself” button (green arrow on Exhibit 2).

Exhibit 2
In the window that opens, you could limit the time period for which content is being activated. If you do not want to limit the time, leave it as is and press the Issue button (Exhibit 3).

Exhibit 3
Transfer to Another User
1. Select the items you intend to transfer and click on the “Transfer” button (green arrow on Exhibit 4).
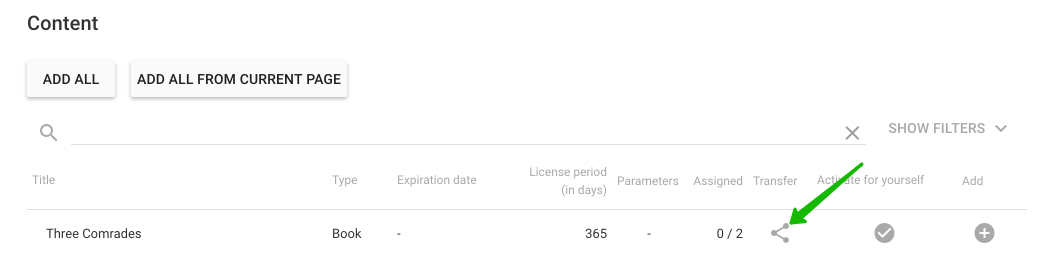
Exhibit 4
2. For books and video, the Aggregion Platform allows for changing the time periods during which content may be transferred to other users. To do that, uncheck the Maximum Period field (red arrow on Exhibit 5), set the Start Date and End Date as desired and press Issue. If you do not want to limit the validity period of the license, do not uncheck Maximum Period and just press the Issue button.
Time-limited licenses may not be transferred for a period that exceeds the time limit set.
When licenses that are not time-limited are transferred for the maximum period, the content is so transferred for an unlimited period of time. For Soft and License Code content, only the Begin Date may be changed. The End Date will be set automatically, according to the license period established by the copyright holder.

Exhibit 5
3. Licenses may be transferred in the following manner:
3.1. To an email address
Entering the intended user’s email is the easiest way to transfer a license. Information necessary to access the content will be sent to this email address. Content may be transferred by email to both registered users and those who are not registered. The system will automatically create accounts for unregistered users.
3.1.1. Select “E-mail” in the window that opens (red arrow on Exhibit 6).

Exhibit 6
3.1.2. Enter the email(s) of one or several (select “Add multiple e-mails”) intended recipients of the license (blue arrow on Exhibit 6).
An incorrectly entered email will cause a validation error, and no content will be transferred (green arrows in Exhibit 6).
You cannot transfer content to a larger number of users than there are licenses available (green arrow in Exhibit 7). A message “Error! Please check the date of assign and availability of free copy” will pop up. Please make sure that the number of recipients indicated matches that of the licenses available.

Exhibit 7
3.1.3. If desired, indicate the expiration date for the content license (purple arrow on Exhibit 6).
3.1.4. Check if the email addresses have been entered correctly and click on the “Assign” button (yellow arrow on Exhibit 6).
3.1.5. A license will be sent to each of the email addresses indicated.
3.2. To a user
You can only transfer content to registered users in this manner.
3.2.1. Select “Users” in the window that opens (green arrow on Exhibit 8).

Exhibit 8
3.2.2. Find users desired by his or her name, email address or ID (blue arrow on Exhibit 8).
3.2.3. If desired, indicate the expiration date for the content license (purple arrow on Exhibit 8).
3.2.4. Click on the “Assign” button (yellow arrow on Exhibit 8).
3.3. To a group of users
This could only be done with existing groups of registered users set up in groups in the “Account-Groups” tab. We recommend you to read the articleCreating user groups for more information.
3.3.1. Select “Groups” in the window that opens (red arrow on Exhibit 9).
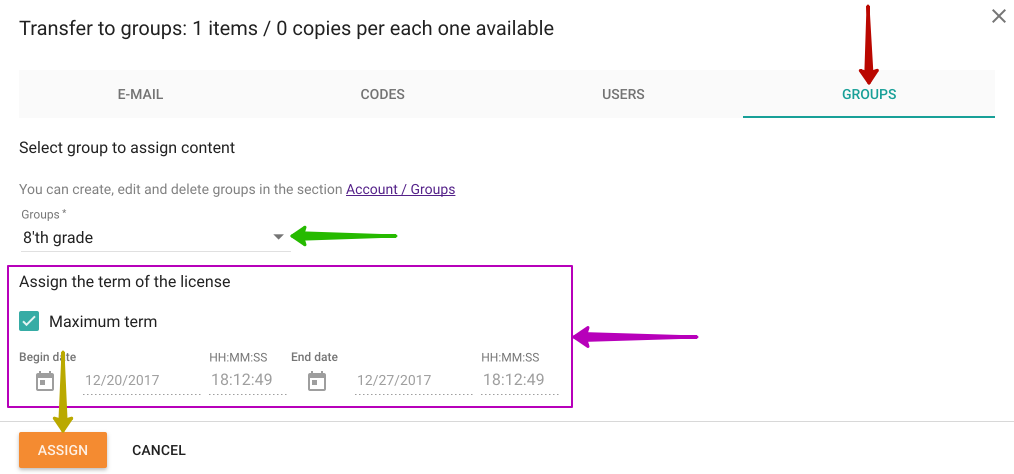
Exhibit 9
3.3.2. Select a group from the list of previously set up groups (green arrow on Exhibit 9). Please remember that you have to have at least as many licenses available as there are group members.
3.3.3. If desired, indicate the expiration date for the content license (purple arrow on Exhibit 9).
3.3.4. Click on the “Assign” button (yellow arrow on Exhibit 9).
3.4. Via codes
This mode is convenient when one needs to transfer a large number of licenses to end users, such as pupils or students, and where it would be easier to use preprinted codes rather than collect email addresses from the intended audience, or where end users are unknown.
3.4.1. Select “Codes” in the window that opens (red arrow on Exhibit 10).
3.4.2. Enter the total number of access codes to be generated (green arrow on Exhibit 10).
3.4.3. If desired, indicate the expiration date for the content license (purple arrow on Exhibit 10)

Exhibit 10
3.4.2. Click on the “Generate” button (yellow arrow on Exhibit 10).
3.4.3. Go to the “Content code” tab (purple arrow on Exhibit 11).
This is where the generated codes will be placed. They can now be copied, saved (export) or printed to be sent to users manually.

Exhibit 11
3.4.6. To see what specific content a Content Code has been generated for, click on the "Additional Information" button (purple arrow in Exhibit 12).

Exhibit 12
3.4.7. To print:
3.4.7.1. Select the codes you want to print, as shown on Exhibit 12.
3.4.7.2. Click on the “Print” button (green arrow on Exhibit 12).
3.4.8. To export:
3.4.8.1. Select the codes you want to print, as shown on Exhibit 12.
3.4.8.2. Click on the “Export” button (red arrow on Exhibit 12).
3.4.9. To remove:
3.4.9.1. Select the codes you want to print, as shown on Exhibit 12.
3.4.9.2. Click on the “Remove” button (blue arrow on Exhibit 12).
3.4.10. Codes Activation
3.4.10.1. Codes may be activated on a special activation page https://user.aggregion.com/.
3.4.10.2. To activate a code, enter it in the field "Activation code", enter an email address in the field E-mail and click on the Activation button.
Re-sending of emails
To resend a letter to the user in whose name content was activated, go to the Return section (green arrow on Exhibit 13) and click on the button marked with a red arrow on Exhibit 13.

Exhibit 13
Withdrawing Previously Assigned Licenses
The “Return” tab (red arrow on Exhibit 14) contains a full list of the activated content. Only books and videos may be returned.

Exhibit 14
1. Find the item in the list that you would like to return.
2. Click on the arrow with an “x” button (green arrow on Exhibit 14).
3. The item will disappear from the list and become available again in the “Activate” tab for assigning. It will also disappear from the mentioned user’s collection of available items.
Transferring of Content as a Batch
The system allows for releasing a number of items at the same time as a batch.
1. Create a list of content to be issued.
1.1. Adding Items to Be Issued
1.1.1. To add items one by one, use the "+" button in the "Add" column (green arrows on Exhibit 15).
1.1.2. To add all of the items displayed on the page as available, click on "Add All From Current Page" (blue arrow on Exhibit 15).
1.1.3. To add all of the items available, click on "Add All" (red arrow on Exhibit 15).

Exhibit 15
1.2. Deleting an Item from the List of Items to Be Issued
1.2.1. If an item has been added in error, you can delete it by clicking on the "-" button in the "Add" column (green arrow on Exhibit 16).
1.2.2. If you want to delete all the items in the list, click on "Remove All" (red arrow on Exhibit 16).

Exhibit 16
2. To review the list created, proceed to the table (blue arrow on Exhibit 16).
2.1. The table will show how many unused licenses remain available for each item. The "Assigned" column (blue arrow on Exhibit 17) will show how many licenses have been acquired, and how many of them issued.
2.2. Any items that may have been put on the list by mistake may be deleted using the "-" button (green arrows on Exhibit 17) in the "Remove" column.
2.3. If you need to recreate the list from scratch, delete all the items on it by clicking on "Remove All" (red arrow on Exhibit 17).

Exhibit 17
3. Once you are ready to release the licenses, click on the "Assign" button on the main screen (yellow arrow on Exhibit 16) or in the table (yellow arrow on Exhibit 17). The release process is described in more detail in the Transfer to Another User section. Each of the addresses specified will be delivered 1 license for each of the items selected.
4. Anytime you want to review the list of items to be issued, click on the "Show Full Table" button (green arrow on Exhibit 18).

Exhibit 18
5. To return from the table to the release screen, click on the "Assign" button (yellow arrow on Exhibit 17).
Changing of the content owner
1. To transfer content to a different user and waive all rights to said content, go to the "Change Licensee" section (red arrow on Exhibit 19).
2. Find the item you wish to transfer and waive all rights to and press the "Transfer" button (blue arrow on Exhibit 19).

Exhibit 19
3. In the window that opens, select the type of the account to which you intend to transfer content.
3.1. Account type: User
3.1.1. Select the option marked with a green arrow on Exhibit 20 if you intend to transfer content to a user.
3.1.2. Find the recipient by email, ID or last name (red arrow on Exhibit 20). The recipient must be registered with Aggregion.
3.1.3. Enter the number of copies to be transferred (blue arrow on Exhibit 20).
3.1.4. Click on the Transfer button (yellow arrow on Exhibit 20).

Exhibit 20
3.2. Account type: Organization
3.2.1. Select the option marked with a green arrow on Exhibit 21 if you intend to transfer content to an organization.
3.2.2. Find the recipient by name (red arrow on Exhibit 21). The recipient must be registered with Aggregion.
3.2.3.Enter the number of copies to be transferred (blue arrow on Exhibit 21).
3.2.4. Click on the Transfer button (yellow arrow on Exhibit 21).

Exhibit 21
4. Content will be transferred, and you will no longer have access to it.
We recommend watching the video on how to transfer purchased licenses.